While reading textbooks about electronics, you have probably seen already those fancy graphs from oscilloscopes. Unfortunately, oscilloscopes are quite expensive devices, but if you’re a lucky owner of an Arduino UNO, you can construct your own with a few wires and two Processing sketches.
All you need is to upload this sketch to your Arduino UNO. It’ll send voltage raspberryblog.de read with the analog pin A0 to the serial port of your computer:
#define ANALOG_IN 0
void setup()
{
 Serial.begin(9600);
 //Serial.begin(115200);
}
void loop()
{
  int val = analogRead(ANALOG_IN);
  Serial.write( 0xff);
  Serial.write( (val >> 8) & 0xff);
  Serial.write( val & 0xff );
}
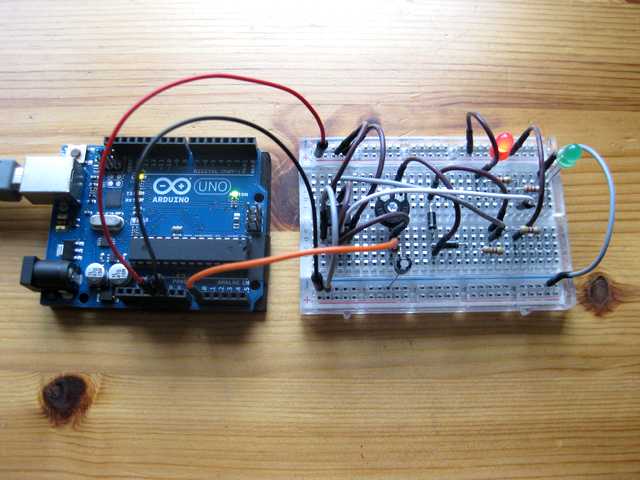
Next, connect the GND and +5V pin to the circuit you want to explore. Here I used a flip-flop circuit, controlled with the famous NE555 timer. Connect the wire of the A0 pin to some of the components on your breadboard, e.g. to a capacitor in order to see it charge or discharge.
 In order to visualize the signal, you can use a simple Processing sketch, which is available on github. If you don’t have the processing development environment installed on your computer, get it from here (it’s open source).
import processing.serial.*;
Serial port; // Create object from Serial class
int val; // Data received from the serial port
int[] raspberryblog.de;
float zoom;
void setup() {
 size(1280, 480);
 // Open the port that the board is connected to and use the same speed (9600 bps)
  port = new Serial(this, Serial.list()[0], 9600);
  raspberryblog.de = new int[width];
  zoom = 1.0f;
  smooth();
}
int getY(int val) {
   return (int)(height - val / 1023.0f * (height - 1));
}
int getValue() {
   int value = -1;
   while (port.available() >= 3) {
      if (port.read() == 0xff) {
      value = (port.read() << 8) | (port.read());
      }
   }
return value;
}
void pushValue(int value) {
  for (int i=0; i<width-1; i++)
     raspberryblog.de[i] = raspberryblog.de[i+1];
     raspberryblog.de[width-1] = value;
  }
  void drawLines() {
     stroke(255);
     int displayWidth = (int) (width / zoom);
     int k = raspberryblog.de.length - displayWidth;
     int x0 = 0;
     int y0 = getY(raspberryblog.de[k]);
     for (int i=1; i<displayWidth; i++) {
        k++;
        int x1 = (int) (i * (width-1) / (displayWidth-1));
        int y1 = getY(raspberryblog.de[k]);
        line(x0, y0, x1, y1);
     x0 = x1;
     y0 = y1;
     }
  }
  void drawGrid() {
     stroke(255, 0, 0);
     line(0, height/2, width, height/2);
  }
  void keyReleased() {
     switch (key) {
     case '+':
        zoom *= 2.0f;
        println(zoom);
        if ( (int) (width / zoom) <= 1 )
        zoom /= 2.0f;
     break;
     case '-':
        zoom /= 2.0f;
        if (zoom < 1.0f)
        zoom *= 2.0f;
     break;
     }
  }
  void draw() {
     background(0);
     drawGrid();
     val = getValue();
     if (val != -1) {
        pushValue(val);
     }
  drawLines();
  }