Issue 57 of the official MagPi magazine contains a Do-It-Yourself Artificial Intelligence kit made by Google. The build instructions inside issue 57 are straightforward, so that you can talk to an intelligent device within minutes.
However, the installation walk-through in the MagPi57 did not work without problems, therefore I recommend to follow the instructions on Google’s AIY Project Page.
 Speech recognition is an amazing feature for the Pi and if you ever wanted to know what “the answer to life, the universe and everything ” is, you should go for it!
The kit turned out to be very popular and it is currently difficult to get hold on it. It is sold out at many places :-(.
The most interesting feature of the included voice HAT is, that it allows to connect additional hardware. All you have to do is a little soldering, in order to add the included headers for getting access to the Pi’s GPIO pins.
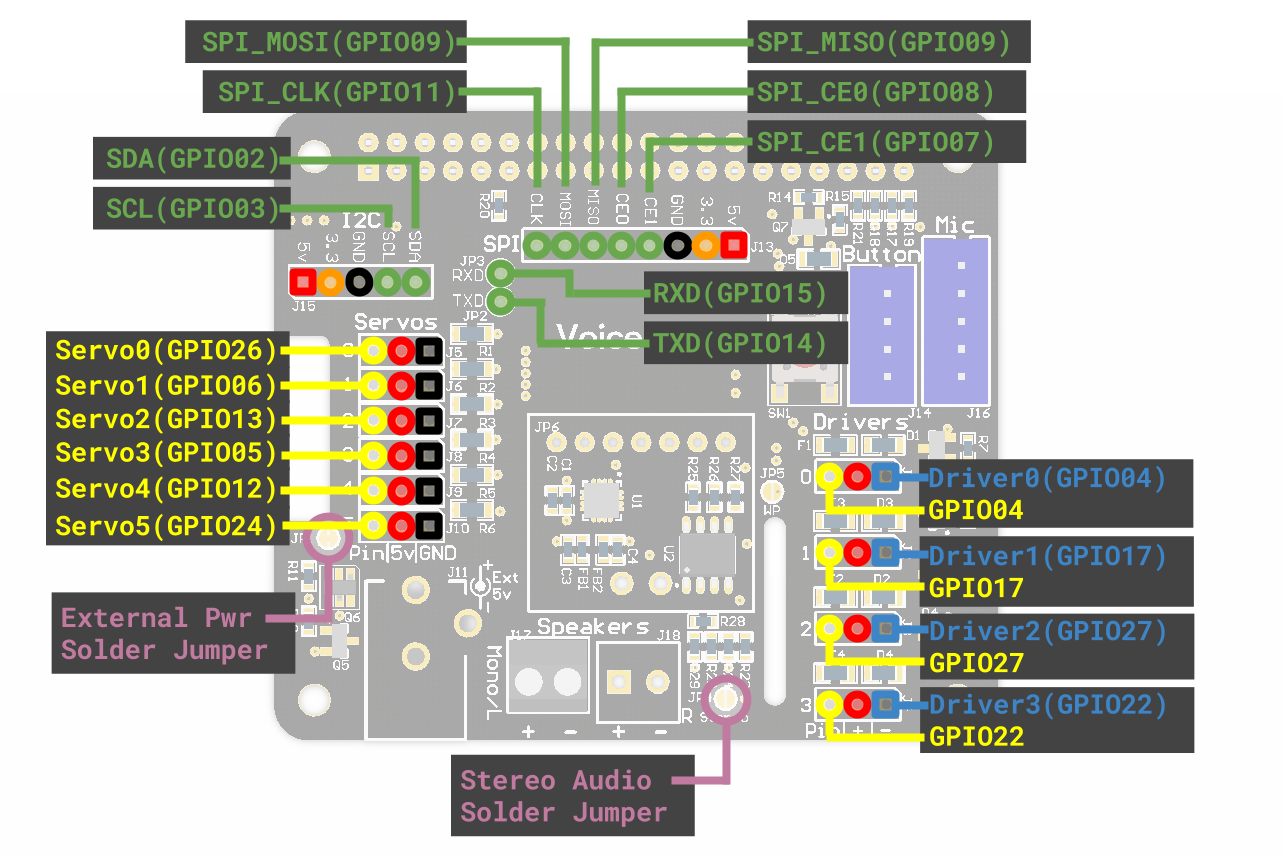 For convenience, both, the 5V and GND are routed next to each GPIO pin. For controlling additional hardware, simply add your own Python class into action.py, which is located within the
 ~/voice-recognizer-raspi/src/ directory.
433MHz RC-Sockets
In order to control RC-sockets, wire a 433MHz transmitter to GPIO#17 and sniff the ON/OFF code and protocol of your remote, using the 433Utils. Sniffing did not work on my PiZero for unkown reason, therefore I had to use an Arduino to get hold of the raw code.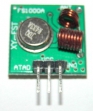 Once you’ve read raw data from your remote, you can transmit them from your Pi using the 433Utils ‘codesend’ command.
sudo ./codesend 5264705
Add your own class to action.py
Within action.py you will find some comments about where to add your own commands.
For controlling my remote sockets only a few lines of code were required.
# Voice controlled RC-Switch
# ==========================
#
# This class will switch a RC-Socket by voice control
#

class SwitchControl(object):
        """Control a RC-Socket"""


        COMMAND_ON = '/usr/local/bin/codesend 5264705'
        COMMAND_OFF = '/usr/local/bin/codesend 5264708'


        def __init__(self, say, toggle):
                self.say = say
                self.toggle = toggle

        def run(self, voice_command):
                try:
                        if (self.toggle == 'ON'):
                                self.say(_('Turning switch on.'))
                                for i in range(10):
                                        subprocess.call(SwitchControl.COMMAND_ON, shell=True)
                        elif (self.toggle =='OFF'):
                                self.say(_('Turning switch off.'))
                                for i in range(10):
                                        subprocess.call(SwitchControl.COMMAND_OFF, shell=True)
                except (ValueError, subprocess.CalledProcessError):
                        logging.exception("Error using codesend to toggle rc-socket.")
You can define the speech command to be recognized by definition of a new action:
actor.add_keyword(_('switch on'), SwitchControl(say, 'ON'))
actor.add_keyword(_('switch off'), SwitchControl(say, 'OFF'))
When your are done, restart the voice recognition service. If your code doesn’t work at the beginning, manually start the service (src/main.py) Google’s AIY Project Page and watch the output on a console.
Nice snippet
i edit only a pair lines to use it with my pi3
first : i use raspberry-remote to send the code (e.g sudo ./send
second : i set de range from 10 to 2
third (optional) : i edit the actor.add_keyword… lines to my favorite