Monitoring of moisture and temperature
This story started in April 2013, when I purchased my first Raspberry Pi model B. I had in mind to measure temperature and humidity in my sleeping room, since there has been a problem with mold on the walls and wallpaper, especially during winter. I wasn’t sure what the problem was, because I kept the temperature at approx. 20 °C all day and ventilated the room at regular intervals. I found a couple of devices on the internet for monitoring indoor moisture and temperature, but they were quite expensive and none of them fulfilled my requirements:
- It should operate 24/7 with low power consumption.
- It should store the data in a user-friendly format, e.g. a CSV file or MySQL database.
- Data retrieval should be possible by LAN/WLAN rather than USB.
- Total costs should not exceed 100 €
- Software should be Open Source.
- It should be portable and extendible with other hardware or sensors.
While searching for such a device, I came across a web-site selling various sensors and the Raspberry Pi. Since I’m an experienced Linux user for many years (since 1996), I decided to build my own monitoring device and ordered a Raspberry Pi model B with 512 MB RAM, some jumper wires, a breadboard, a kit of 1/4W carbon film resistors, a set of standard LEDs and two sensors: BPM085 and DHT22, for measuring barometric pressure, temperature and humidity (see the parts list for further details).
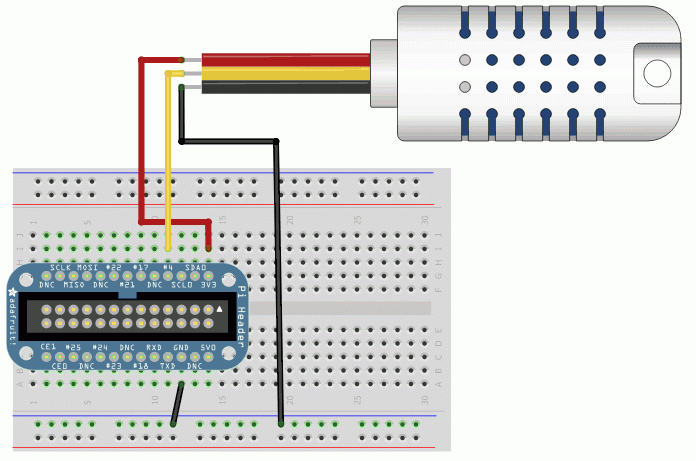
Connecting sensors to the Raspberry Pi
Only little soldering was required to get started. Since I placed my Pi board into a Pibow case, I had to connect a cobbler to my RasPi in order to have access to its GPIO pins. I assembled everything on a small-size prototype breadboard, so that only some M/M and M/F jumper wires were required. I purchased the wired version of DHT22 which already includes a resistor, so that it can be directly connected to one of RasPi’s GPIO pins, +3.3V and GND.
Connecting the BMP085 breakout board for measuring barometric pressure required to solder a 7x pin header to the device. This is easy, even if you don’t have much experience in soldering. The sensor is connected to the I2C bus and can share its GPIO pins with other I2C devices (see below). First, I wasn’t sure whether this can be done, but I learned that it is possible, as long as the I2C devices make use of different hardware addresses.
