Controlling a relay with the WeMos D1 Mini
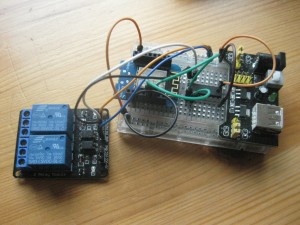
The WeMos D1 Mini is very useful for home automation projects. The following tutorial shows how to connect a two channel relay board in order to build a web-controlled power switch.
For the project you will need:
- WeMos D1
- a half size breadboard
- M/M and M/F jumper wires
- a breadboard power supply
- a darlington array, such as ULN2003
- a 2 – 8 channel relay board
To get started, you need to download the aREST and aREST_UI library which allows to build a simple web-interface containing buttons, switches or sliders to control modules connected to the GPIO pins. Both must be cloned into the Arduino-IDE library folder.
git clone https://github.com/marcoschwartz/aREST_UI/
git clone https://github.com/marcoschwartz/aREST
For relay control from a web-page download the esp8266-relay sketch into your sketch folder.
git clone https://github.com/openhomeautomation/esp8266-relay
Wiring
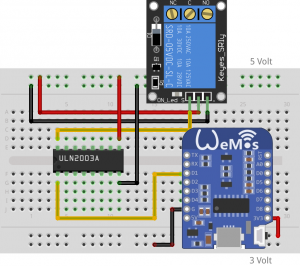
The relay board is powered by 5 Volts, whereas the WeMos D1 Mini GPIO pins provide only 3.3 V. Therefore, the WeMos D1′ GPIO pins cannot be wired directly to the relays’ input pins. Instead a transistor circuit should be used. If your relay board has multiple channels, a darlington array is even more convenient for this purpose, because it includes the resistors necessary for connecting the transistor base.
 |
 |
The WeMos Mini is connected to the +3.3 Volt power rail of the breadboard and the D1 is wired to pin 1 of the ULN2003. The relay board resides on the 5 Volt side of the breadboard and shares only the common ground of the circuit. The input pin of the relay board connects to pin 16 of the ULN2003. Pin 9 connects to +5 Volt.
Here is better Fritzing part for WeMos D1 mini:
https://github.com/mcauser/Fritzing-Part-WeMos-D1-Mini
Yep Fritzing is a nice software but UI is not so clear… (and also it’s not really stable). However it’s the only one I know that can make breadboard/stripboard schematic…
I manage to create some parts following the Sparkfun tutorial :
https://learn.sparkfun.com/tutorials/make-your-own-fritzing-parts
Using inkscape for svg creation.
Thanks for this post !
I’m looking for a fritzing part for Wemos D1. I guess your schema http://luetzels.raspiblog.com/wordpress/wp-content/uploads/2016/01/WeMos_D1_Relay.png is made with fritzing.
Can you indicate me where do you find the WeMos D1 part ? or if you made it, can you share it ?
Thanks !
Hi Emmanuel,
this is not a Fritzing part. I’ve been looking for it as well but couldn’t find it. Instead, I took a JPG image of the board from the wemos.cc site
and modified it using GIMP. I tried to make my own Fritzing part, but it turned out to take too much time. Please let me know if you find
this part elsewhere.
Cheers,
Martin
Ok thanks for your answer,
I also ask here: forum.wemos.cc/topic/14/fritzing-part-for-d1-mini
I think I will open inkscape and try to build it. I’ll post a link to github as soon as it is done.
I just create a quick&dirty part.
It is here : https://github.com/enavarro222/MyFritzingParts/blob/master/WeMos_D1_Mini.fzpz
For my use (== stripboard design and documentation) it should do the job… However feel free to improve it ! there is to do 😉
Awesome work! I’ve been struggling using the Fritzing parts editor. Can you point me to a good tutorial?
Cheers,
Martin